FoneDog Screen Recorder FoneDog Screen Recorder
Special Offer Special Offer
Only Only
$4.49 $4.49
to get a ONE-month license to get a ONE-month license
Sale ends in xx days Sale ends in xx days
Buy Now
sale

Best Solutions: How to Transfer iPhone Contacts to iPhone

By Nathan E. Malpass, Last updated: April 30, 2024

Upgrading to a new iPhone is always an exciting experience. The sleek design, advanced features, and enhanced performance can significantly enhance your digital life. However, amidst the excitement, there's one crucial task that often causes a bit of concern – the process to transfer iPhone contacts to iPhone. With the rapid pace of technological advancements, fortunately, the process has become remarkably streamlined and user-friendly.

Gone are the days of manually copying contacts or relying on complex syncing methods. In this article, we'll delve into the various seamless solutions available to effortlessly transfer your iPhone contacts to a new device. Whether you're tech-savvy or a novice, there's a method that suits your comfort level. From utilizing iCloud and iTunes to exploring some top iOS third-party transfer apps, we've got you covered.

Stay tuned as we guide you through a range of methods, each designed to cater to different preferences and scenarios. Say goodbye to the hassle of losing contacts during an upgrade – with our comprehensive insights, you'll be able to seamlessly transition to your new iPhone without missing a beat.

Part #1: Methods to Transfer iPhone Contacts to iPhonePart #2: Top Method to Transfer iPhone Contacts to iPhone: FoneDog Phone TransferSummary

Part #1: Methods to Transfer iPhone Contacts to iPhone

Method #1: Using AirDrop

Moving data to an iPhone absolutely needs a WiFi connection? No, AirDrop, a convenient feature native to Apple devices, allows you to wirelessly transfer various types of content, including contacts, between iPhones. This method is ideal when you're in close proximity to the recipient's iPhone. Here’s how to transfer iPhone contacts to iPhone using AirDrop:
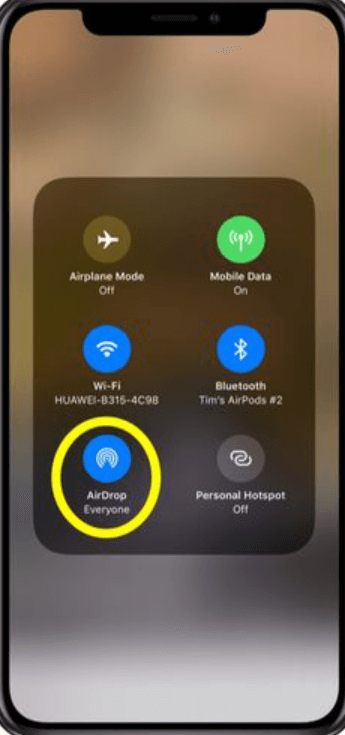
  1. Enable Bluetooth and Wi-Fi: Ensure that both Bluetooth and Wi-Fi are turned on for both iPhones.
  2. Activate AirDrop: Swipe down from the top-right corner of the screen to open the Control Center. Tap on the “AirDrop” icon and select either “Contacts Only” or “Everyone”, depending on your preference for visibility.
  3. Select Contacts to Transfer: Open the Contacts app on the source iPhone. Browse and select the contacts you wish to transfer.
  4. Tap “Share”: Once the desired contacts are selected, tap on the “Share” option.
  5. Choose AirDrop Recipient: A list of nearby AirDrop-compatible devices will appear. Select the target iPhone’s name from the list.
  6. Accept on Recipient iPhone: On the recipient's iPhone, a prompt will appear requesting acceptance of the AirDrop transfer. Once accepted, the contacts will be transferred to the recipient’s Contacts app.

Transfer iPhone Contacts to iPhone Using AirDrop

Advantages:

  • Quick and Wireless: AirDrop ensures a swift and cable-free transfer of contacts. ser-Friendly: The process is simple and intuitive, making it suitable for users of all skill levels.
  • No Third-Party App Needed: AirDrop is a built-in feature, eliminating the need for additional apps or services.

Considerations:

  • Proximity Requirement: Both iPhones need to be within Bluetooth and Wi-Fi range for AirDrop to work effectively.
  • Compatibility: AirDrop requires relatively modern iPhone models and compatible iOS versions.
  • Limited to Apple Devices: AirDrop is exclusive to Apple devices and doesn't work with other platforms.

Transferring contacts using AirDrop is a fantastic option when you're physically near the recipient's iPhone. However, if you're looking for alternative methods that provide more flexibility in terms of distance and device compatibility, continue reading to explore other efficient transfer solutions.

Method #2: Using iCloud Sync

iCloud provides a seamless way to sync and transfer contacts between iPhones, irrespective of their physical proximity. This method is ideal for those who want a cloud-based solution for contact transfer.
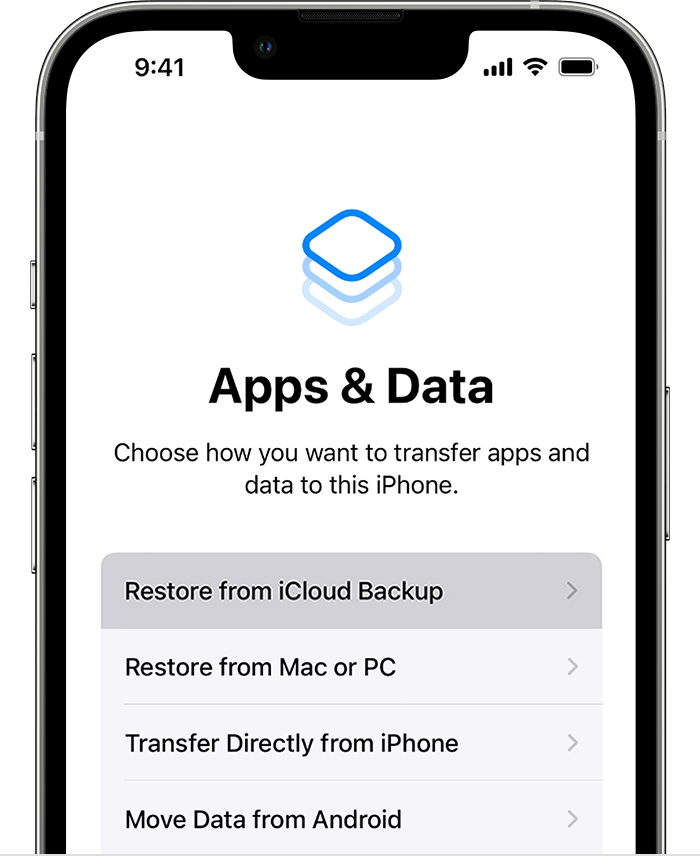
  1. Backup Source iPhone: Before initiating the transfer, ensure that your source iPhone’s contacts are backed up to iCloud. To do this, go to “Settings” > [your name] > “iCloud” > “Contacts” and toggle on the switch.
  2. Sign In on New iPhone: Turn on your new iPhone and follow the setup process until you reach the “Apps & Data” screen. Choose “Restore from iCloud Backup” and sign in with the same Apple ID used to back up the contacts.
  3. Select Backup: From the list of available backups, select the most recent one that includes your contacts.
  4. Wait for Transfer: Your new iPhone will begin restoring from the selected iCloud backup. Wait for the process to complete. This may take some time depending on the size of your backup and your internet speed.
  5. Verify Contacts: Once the restoration is complete, your contacts will be available in the Contacts app on your new iPhone.

Transfer iPhone Contacts to iPhone Using iCloud Sync

Advantages:

  • Cloud Convenience: iCloud sync ensures your contacts are available across your Apple devices through cloud storage.
  • Effortless Restoration: The setup is simple, and iCloud takes care of restoring your contacts and other data.
  • No Physical Connection Needed: This method works as long as both iPhones have internet connectivity.

Considerations:

  • Storage Space: Ensure your iCloud storage has enough space to accommodate the backup and contacts.
  • Internet Connection: A stable and relatively fast internet connection is necessary for a smooth transfer.

Method #3: Using Google Contacts

Utilizing Google Contacts to transfer your iPhone contacts offers a cross-platform solution that doesn't rely solely on Apple's ecosystem. This method is suitable for those who want to keep their contacts accessible on both Android and iOS devices. Here’s how to transfer iPhone contacts to iPhone using Google Contacts:

  1. Export iPhone Contacts: On your source iPhone, open the Settings app, scroll down, and tap “Passwords & Accounts”. Select “Add Account” and choose “Google”. Sign in with your Google account credentials. Toggle on the “Contacts” option to sync your iPhone contacts with Google.
  2. Import to New iPhone: On your new iPhone, open the Settings app and go to “Passwords & Accounts”. Select “Add Account” and choose “Google”. Sign in with the same Google account used in the previous step and enable the “Contacts” toggle.
  3. Wait for Sync: Google Contacts will now sync the contacts from your source iPhone to your Google account. This may take some time depending on the number of contacts.
  4. Verify Contacts: Open the Contacts app on your new iPhone to ensure that the contacts from your Google account have been successfully imported.

Transfer iPhone Contacts to iPhone Using Google Contacts

Advantages:

  • Cross-Platform Compatibility: This method allows you to transfer contacts between iOS and Android devices.
  • Online Accessibility: Your contacts are available through your Google account, accessible from any device with internet access.
  • Backup: Google Contacts serves as a backup of your contacts, reducing the risk of data loss.

Considerations:

  • Google Account: You need to have or create a Google account for this method.
  • Privacy: Be aware of the privacy policies associated with using Google services and storing your contacts on their servers.
  • Sync Settings: Ensure that you've configured the sync settings correctly to avoid any unwanted changes or duplicates.

Using Google Contacts as an intermediary allows you to bridge the gap between different platforms and retain access to your contacts across a variety of devices. If you're interested in exploring further methods or discovering specialized tools for contact transfer, continue reading our comprehensive guide for a well-rounded understanding of your options.

Method #4: Using the SIM Card

If you prefer a more traditional approach, you can use your SIM card to transfer contacts from one iPhone to another. This method is useful when you're switching to a new device and want to keep your contacts stored locally on the SIM card.
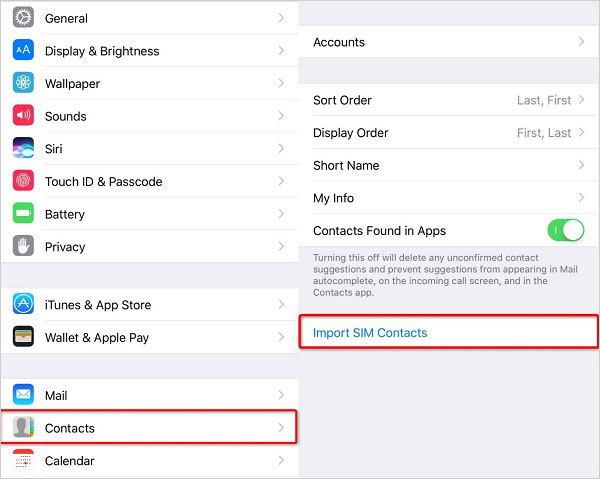
  1. Export Contacts to SIM: On your source iPhone, open the Settings app and scroll down to select “Contacts”. Choose “Import SIM Contacts” and wait for the process to complete. This will copy your iPhone contacts to the SIM card.
  2. Insert SIM into New iPhone: Carefully remove the SIM card from your source iPhone and insert it into your new iPhone.
  3. Import SIM Contacts: On your new iPhone, navigate to “Settings” > “Contacts” > “Import SIM Contacts”. This will transfer the contacts from the SIM card to your new iPhone’s internal storage.
  4. Verify Contacts: Open the Contacts app on your new iPhone to ensure that the contacts from the SIM card have been successfully imported.

Transfer iPhone Contacts to iPhone Using the SIM Card

Advantages:

  • Offline Transfer: This method doesn’t require an internet connection or third-party accounts, making it a convenient offline option.
  • Quick Process: The transfer itself is relatively quick and doesn’t involve complex setup.

Considerations:

  • Limited Storage: SIM cards have limited storage capacity, so this method is best suited for a smaller number of contacts.
  • Contact Details: Some contact details, like email addresses, photos, and additional notes, might not transfer effectively using this method.
  • Contact Duplication: There’s a possibility of duplicates if you’ve previously stored contacts on the SIM card.

Using the SIM card method provides a straightforward way to transfer contacts between iPhones. However, keep in mind the limitations associated with SIM card storage and the potential loss of certain contact details during the transfer. If you're dealing with a larger contact list or require a more comprehensive solution, continue exploring the remaining methods in our guide.

Method #5: Using iTunes

Using iTunes, Apple's media management software is another way to transfer your iPhone contacts to a new device. This method is particularly suitable for those who prefer to manage their data through a computer and want a full backup and restore solution. Here’s how to transfer iPhone contacts to iPhone using iTunes:
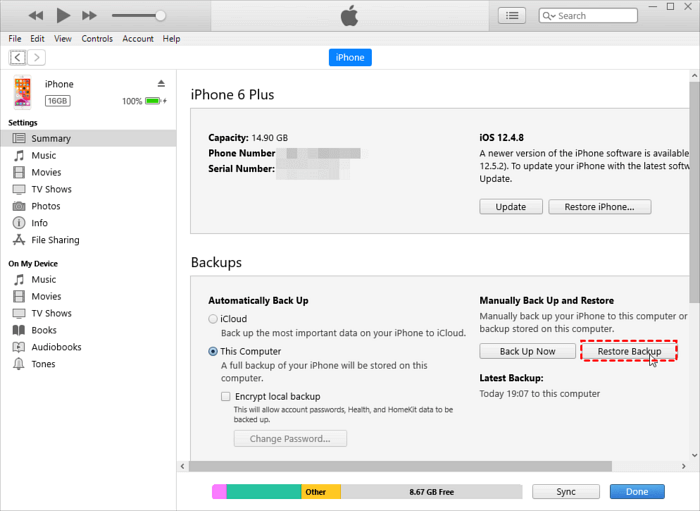
  1. Backup Source iPhone: Connect your source iPhone to your computer and open iTunes (or Finder on macOS Catalina and later). Select your device when it appears in iTunes.
  2. Create Backup: In the device summary page, under the “Backups” section, choose “This computer” and click on “Back Up Now”. This will create a backup of your source iPhone, including your contacts.
  3. Disconnect Source iPhone: Once the backup is complete, disconnect your source iPhone from the computer.
  4. Connect New iPhone: Connect your new iPhone to the computer and select it in iTunes (or Finder).
  5. Restore from Backup: In the device summary page, under the “Backups” section, select “Restore Backup”. Choose the backup you created in step 2 and click “Restore”. This will transfer your contacts and other data to the new iPhone.
  6. Wait for Restore: Wait for the restore process to complete. Your new iPhone will restart, and your contacts will be available in the Contacts app.

Transfer iPhone Contacts to iPhone Using iTunes

Advantages:

  • Comprehensive Backup: This method transfers all your data, not just contacts, providing a complete replica of your source iPhone.
  • Computer Management: If you prefer managing your data through a computer, iTunes offers a familiar interface.
  • Offline Transfer: This method doesn’t rely on an internet connection for the transfer process.

Considerations:

  • Computer Required: You need access to a computer with iTunes (or Finder) installed for this method.
  • Backup and Restore Time: The process may take longer compared to some other methods, especially for larger backups.
  • Data Overwrite: Keep in mind that the restore process will overwrite data on the new iPhone, so ensure you have a backup of any existing data.

Part #2: Top Method to Transfer iPhone Contacts to iPhone: FoneDog Phone Transfer

When it comes to efficiently transferring iPhone contacts to a new device, FoneDog Phone Transfer stands out as a powerful and user-friendly tool. This method offers a comprehensive solution that's perfect for those who want a straightforward, reliable, and versatile approach.

Phone Transfer Transfer files among iOS, Android and Windows PC. Transfer and backup text messages, contacts, photos, video, music on computer easily. Fully compatible with the latest iOS and Android. Free Download FoneDog Phone Transfer

FoneDog Phone Transfer is an iPhone 15-supported tool and specialized software designed to transfer various types of data, including contacts, between different smartphones. Whether you're switching between iPhones or moving from Android to iOS, this tool streamlines the process with just a few clicks.

Here are the steps to use it to transfer iPhone contacts to iPhone:

  1. Download and Install: Install FoneDog Phone Transfer on your computer from the official website.
  2. Connect iPhones: Launch the software and connect both your source and target iPhones to your computer using USB cables.
  3. Choose Contacts: In the software’s interface, select the data types you want to transfer. In this case, choose “Contacts”.
  4. Initiate Transfer: Click the “Start Transfer” button. The software will begin transferring contacts from the source iPhone to the target iPhone.
  5. Complete Transfer: Wait for the transfer process to finish. Once completed, you’ll find all your contacts safely transferred to your new iPhone.

Transfer iPhone Contacts to iPhone: FoneDog Phone Transfer

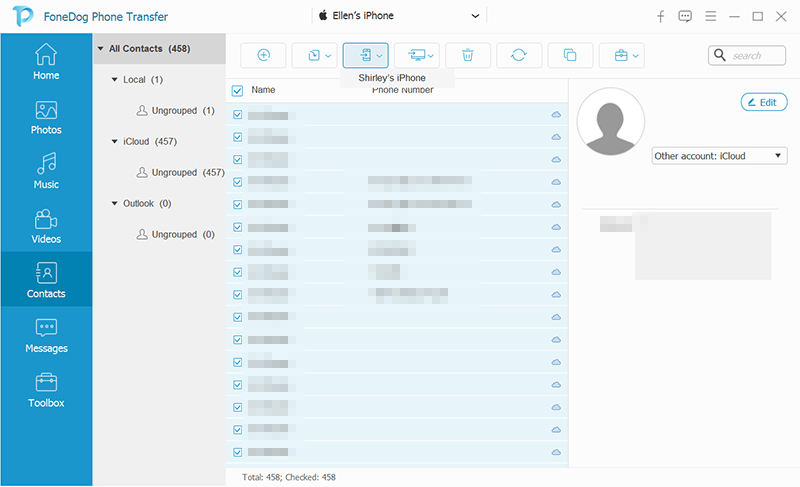
FoneDog Phone Transfer offers a reliable and efficient way to transfer iPhone contacts to a new device, regardless of the platform you're using. If you value simplicity, speed, and flexibility, this tool can be a valuable asset during your transition to a new iPhone. Remember to explore your options and choose the method that best suits your preferences and requirements.

People Also Read5 Most Effective Ways to Transfer iPhone Contacts to Mac5 Ways to Transfer iPhone Contacts to HTC for Free

Summary

Transferring iPhone contacts to a new device is a crucial step when upgrading to a new iPhone. The process has evolved over the years, offering various methods to suit different preferences and situations.

You may also utilize specialized software like FoneDog Phone Transfer for comprehensive cross-platform data transfers, including contacts, messages, media, and more.

Whether you're tech-savvy or prefer a straightforward solution, there's a method available to transfer iPhone contacts to iPhone. Choose the one that aligns with your preferences, needs, and the devices you're using. With the right method, your transition to a new iPhone can be seamless, allowing you to enjoy your new device without losing your important contacts.

Leave a Comment

Comment

Comment ()
author image

Nathan E. Malpass

iPhone/Android Devices’ Maintenance Expert

Staying home, listening to music, writing tech articles

Many people asked me to repair their mobile phones so I have a lot of experience in mobile phone repair, and I know a lot about Android or Apple phones.

Phone Transfer logo

Phone Transfer

Transfer data from iPhone, Android, iOS, and Computer to Anywhere without any loss with FoneDog Phone Transfer. Such as photo, messages, contacts, music, etc.

Free Download

How Do You Like This Article?

Check icon/ Check icon

INTERESTINGDULL

Check icon/ Check icon

SIMPLEDIFFICULT

Thank you! Here' re your choices:

Rate This Article: Excellent

Rating: 4.7 / 5 (based on 98 ratings)

Phone Transfer logo

Phone Transfer

Transfer data from iPhone, Android, iOS, and Computer to Anywhere without any loss with FoneDog Phone Transfer. Such as photo, messages, contacts, music, etc.

Free Download

FoneDog uses cookies to ensure you get the best experience on our website. Click here to learn more.