FoneDog Screen Recorder
FoneDog Screen Recorder
Special Offer
Special Offer


By Adela D. Louie, Last updated: May 2, 2024
Have you ever wondering where your impressive gaming moments or compelling live streams go once you press “Stop Recording” tab in OBS? Uncover the response to "where does OBS save recordings" by exploring this guide! This article delves into the inner workings of OBS Recorder, the dominant force in streaming and recording, to uncover the specific locations where your recordings are saved.
For those who are new and eager to learn, it is important to know the specific location where OBS stores your recorded files. This knowledge is essential for efficiently organizing your content. We will guide you through the complex system of file folders and configurations, enabling you to fully utilize their capabilities.
Part 1. Overview: Where Does OBS Save Recordings?Part 2. How to Modify the Storage Location of OBS RecordingsPart 3. Best Alternative to OBS in Screen RecordingPart 4. FAQs of OBS RecordingConclusion:
Following your session with OBS, it's crucial to be aware of the whereabouts of your recorded content. In the absence of any specific directives regarding the storage location, your OBS recordings typically reside within the default directory of the OBS installation folder. Therefore, to access these recordings, navigate to the location where OBS is installed on your system.
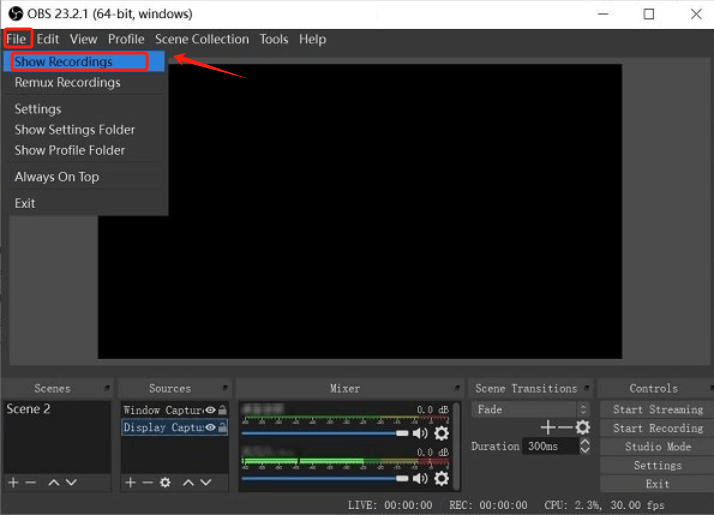
For expedited access to your OBS recordings, launch OBS and navigate towards the uppermost menu bar. From that, press on "File" and ensure to select the "Show Recordings" option right within the dropdown menu. This action will promptly display all the screen recordings within OBS.
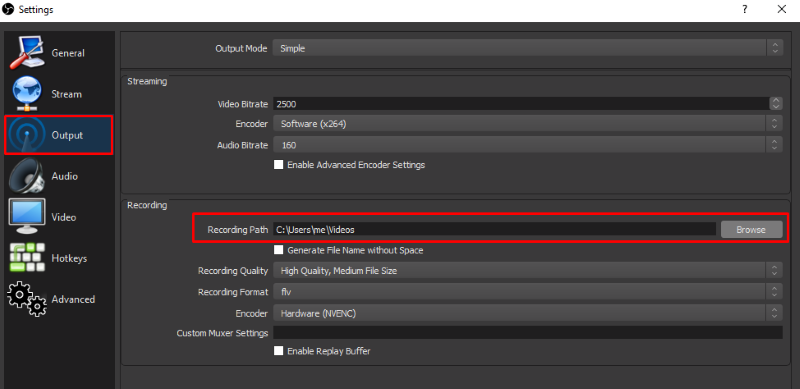
By default, OBS stores screen recordings in its preset location. For Windows users, this default location is within the Video folder of the computer. However, if you wish to designate a specific folder for storing these recordings, you can customize the file path.
This process entails accessing OBS's Settings menu and navigating to the Output section. To provide a detailed walkthrough, here's a step by step guide on how to alter the recording path in OBS:
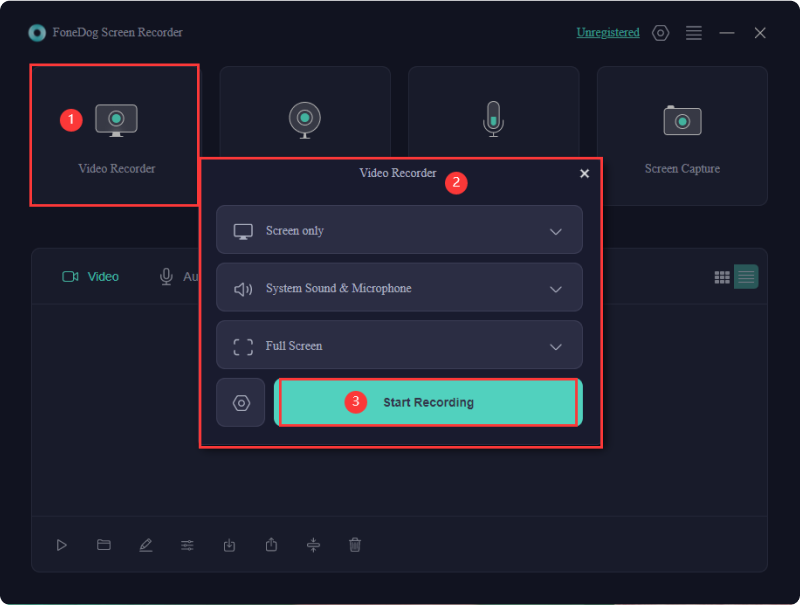
FoneDog Screen Recorder stands out as a premier alternative to OBS for screen recording. With intuitive interface and powerful features, it offers seamless recording experience for both beginners and professionals.
FoneDog ensures high-quality output, customizable settings, and diverse recording options, including full screen, specific windows, or customized areas. Its simplicity, efficiency, and reliability make it the top choice for screen recording tasks across various platforms.
![]() Free Download
For Windows
Free Download
For Windows
![]() Free Download
For normal Macs
Free Download
For normal Macs
![]() Free Download
For M1, M2, M3
Free Download
For M1, M2, M3
OBS doesn't save recordings instantly; users have to start the recording process themselves. Once recording begins, OBS captures the specified content until manually stopped, after which users can choose to save the recording to their desired location on their computer.
The disk space occupied by OBS recordings varies based on factors like resolution, frame rate, and encoding settings. On average, recordings can consume around 1 to 2 GB per minute for high-quality footage at standard settings.
Currently, OBS recordings are typically accessible only on the device where OBS is installed. However, you can transfer recordings to mobile devices or other platforms via cloud storage, file sharing, or direct transfer methods.
Considerations when saving recordings in OBS Studio include disk space usage, file formats, and recording quality. Ensure sufficient storage, choose appropriate formats, and balance quality with file size. Regularly review and manage recordings to prevent storage overflow.
People Also Read[9 Ways] How to Fix OBS Game Capture Black Screen ErrorWhere Are Google Meet Recordings Saved? [2024 GUIDE]
In conclusion, OBS provides flexibility in saving recordings, allowing users to choose default or custom paths. It empowers users to manage storage efficiently and tailor settings to their preferences. However, understanding and knowing the answer for “where does OBS save recordings” and managing recorded files are crucial for seamless workflow. As such, OBS FoneDog Screen Recorder indeed stands out for versatility and control, enhancing the screen recording experience.
Leave a Comment
Comment

Tech Website Writing /Content Optimization
Singing, smiling, surprising every day!
So as a technical writer, it is my duty to gather effective and reliable solutions to answer questions on how to deal with the issues they are having with their devices.
Screen Recorder
Powerful screen recording software to capture your screen with webcam and audio.
Hot Articles
 /
/
INTERESTINGDULL
/
SIMPLEDIFFICULT
Thank you! Here' re your choices:
Excellent
Rating: 4.5 / 5 (based on 91 ratings)